SCCM 1511 – A new SCCM

In case you missed it – Microsoft released the next version of SCCM yesterday!  The download just finished, so I haven’t implemented it yet, but I’ll be sure to post about the features when I do.

When you go to log into ye olde licensing.microsoft.com, you’ll want to look for System Center Config Mgr Client Mgmt License (current branch) to find your download.

While you wait, The System Center Dudes have a great write up on the new features, screenshots and all – List and explanation of SCCM 1511 New features

0 Comments
Tags:
December 9, 2015

SCCM – Automatically put computer in OU based on it’s name during OSD

You know what saves a lot of time when imaging computers?  Having SCCM automatically put that computer in the right AD OU for you.

This system requires you to name your computers with a three letter prefix that is associated to the proper OU. No need for MDT or anything.

Set It Up

First open the properties for the All Unknown Computers Device Collection in SCCM, and add a Collection Variable called OSDComputerName with a blank value.

In your Task Sequence, add a step to run your customized version of the script below between the Apply Windows Settings and the Apply Network Settings step. (do this from a package in which there is a .bat file containing the script). In the Apply Network Setting Step, leave the Domain OU field blank.

When you run the task sequence from PXE, you will be promped to define the value of OSDComputerName. The TS will take the first three letters and move it where it needs to go. If the first three letters don’t match any in your list, it goes to the OU defined in the script as OSDDomainJoinOU. In this example script, a computer named ABC-Workstation1 will wind up in the ABC OU, whereas a computer named DEF-Workstation1 will wind up in the DEF OU, etc. Something with the first three letters that aren’t ABC, DEF, or GHI will wind up in the Workstations OU (as defined by the default).

Example Code:

Dim strComputer, OSDComputerName, env
Dim objWMIService, objChassis, colChassis, strChassisType 
Dim OSDDomainOUName, strChassisTypeIs 
 Set env = CreateObject("Microsoft.SMS.TSEnvironment")
 OSDComputerName = env("OSDComputername")
If OSDComputerName="" Then 
 OSDComputerName=env("_SMSTSMachineName")
End If

'Default: 
 OSDDomainJoinOU = "LDAP://OU=Workstations,DC=yourdomain,DC=com"
 subGenLocale
 env("OSDDomainOUName") = OSDDomainJoinOU
WScript.Quit

Sub subGenLocale
 Select Case Mid(ucase(OSDComputerName),1,3) 
 Case "ABC" 
 OSDDomainJoinOU = "LDAP://OU=ABC,DC=yourdomain,DC=com"
 Case "DEF" 
 OSDDomainJoinOU = "LDAP://OU=DEF,DC=yourdomain,DC=com"
 Case "GHI" 
 OSDDomainJoinOU = "LDAP://OU=GHI,DC=yourdomain,DC=com"
 Case "JKL" 
 OSDDomainJoinOU = "LDAP://OU=JKL,DC=yourdomain,DC=com"

 End Select
End Sub

Next Steps?

So now that you have your computers going to the right AD OU, why not think about some intelligent deployments to device collections that are automatically populated from OU memberships?  Deploy that finance software to the finance device collection that is auto-populated from the finance OU in AD.  Then all you have to do is name a computer “FIN-whatev” and walk away while it gets built and gets the right software.

1 Comments
December 1, 2015

Windows 10 – How to Make an Assigned Access Web Browser App

UPDATE: There is an easier way to accomplish this, which I’ve detailed in a new post, found here: http://thebillablelife.com/windows-10-assigned-access-web-browser-app/


Windows 8.1 introduced “Assigned Access,” which allows an administrator to restrict a user to a single Windows Store application.  This seemed to get the most use from people making simple kiosk computers that were assigned access to a single website using the Metro Immersive Windows Store app version of Internet Explorer.  MSDN advised against using a web browser for assigned access, saying that they require special permissions beyond those usually granted to Windows Store apps, but it will still let you use Metro IE.  In Windows 10, the Microsoft gods decided that browsers really don’t belong in Assigned Access, and you can’t choose to use them anymore.  Luckily they offered some simple work-arounds:

AssignedAccess1

Either make your own browser app, or just make a web kiosk the old school obnoxious way.  I cursed Microsoft at their suggestion of Option 1.  I’ve made web kiosks before using an expanded version of Option 2, and it generally sucks to manage because the whole damn thing is locked down, not just a single user – meaning you can’t just log out as the kiosk user, and log in as an admin to do whatever needs to be done.  With Assigned Access I can just log out of the assigned access user, log in as a normal user, and have a normal user experience.

In my case, I need a public kiosk to display one website on a touchscreen monitor.  The user will not browse to any other site, and I want them to have absolutely no access to the OS beyond the assigned website.

So, I chose to tackle my own browser app.  I mean, it sounds easy from their casual mention of it, and it’s the first suggestion, so it’s probably the way to go.  Having never really developed anything at all before, it was a learning process to stumble through Visual Studio, but it’s not bad.  Note that this is based largely on this post, which explains accomplishing prettymuch the same thing but with an older version of Visual Studio, and it actually includes more than I needed, so I kept it even simpler.  I’ll go through my process for how to make an assigned access web browser app in the steps below.

Step 1 – Download Visual Studio Community 2015

You can get this here.  It’s free, but can gobble up a significant chunk of space (16-26gb depending on what features you choose to install).  You will need to install, at minimum, the Visual C# programming language and it’s common tools, and the Universal Windows App Development Tools.  Note that I installed a lot more than this out of curiosity, but these should be the minimum for doing this job.

Step 2 – Make a New Project in Visual Studio

This is straightforward.  Click New Project, choose C# Blank Project, name it something relevant, save it somewhere smart (I chose a new folder in my OneDrive so I could work wherever), and you’re ready to go.  It’s probably smarter to use GitHub or something Properly Deverloper-y, but I’m not a developer and I’m used to living in OneDrive, so rather than learn another new thing I decided to save there.

Step 3 – Stumble Through The Code

Here is the long-form MSDN explanation of the WebView class and all it’s features.  It’s not very eye opening, or helpful to you at this point.  All you really need to focus on are MainPage.xaml, and MainPage.xaml.cs.

In MainPage.Xaml you’ll get a designer view that lets you either visually drag your layout around, or edit the code directly in the window below.  You’ll need the code to be this, however you do it:

AssignedAccess2

Copy-and-paste-able version:

<Grid Background="{ThemeResource ApplicationPageBackgroundThemeBrush}">
  <WebView x:Name="WVWebBrowser" HorizontalAlignment="Stretch" Height="Auto" VerticalAlignment="Stretch" Width="Auto"/>
</Grid>

So that chunk is calling WVWebBrowser, which we haven’t made yet.  Go to MainPage.xaml.cs and use this code:

AssignedAccess3

Copy-and-paste-able version:

 {
  public MainPage()
  {
  this.InitializeComponent();
  WVWebBrowser.Navigate(new Uri("http://WebsiteYouWantToDisplay.com"));
  }
  }
Step 4 – Run Your App

Assuming you’re using Windows 10, choose to run the application on your local machine, with your chosen architecture (x86/x64) by clicking the “Play” button.

AssignedAccess4

Your app should open, and you should be able to use it like it’s the real deal.

Step 5 – Graphics (optional)

This is optional, but if you browse to your project saved folder path and find the folder called Assets, it has placeholder graphics for your app.  Using such quality software as Microsoft Paint, I made appropriately sized graphics for my app, which allowed it to have a swanky splash screen at start, plus look nice on the Start Menu, and allow for re-sizing the app’s tile there.

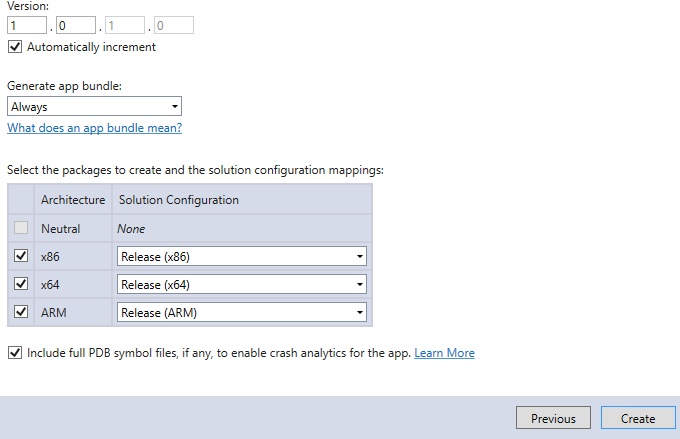
Step 6 – Create App Packages

In Visual Studio, go to Project, Store, Create App Packages.  You can choose to make packages for x86, x64, or ARM.

AssignedAccess5

AssignedAccess6

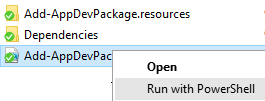
Step 7 – Install App

Now you can take your App Packages to the computer you’d like to use it on.  Make sure that you’ve enabled Developer Mode in the Windows 10 Settings in order for this to work – it will gently remind you if you haven’t.  To install, you need to browse to the App Package root, right click on the Add=AppDevPackage.ps1 script, and choose run with PowerShell.

AssignedAccess7


Step 8 – Set up Assigned Access User

As an admin on the machine where you installed your new app, create a new local user account that is just a standard user.  Switch user and log in as the new user, then install your app as that user and verify it works.  Now go back to your admin user, and go to All Settings > Accounts > Other users, and click on “Set up assigned access.”  Choose the user and your app, and that’s it.  Switch user back to your new assigned access user, and your app will automatically open and keep your locked in it.  To log out, Ctrl + Alt + Del.

Step 9 – Set up Automatic Login for Assigned Access User (optional)

Since this machine will be a public machine, and for simplicity’s sake I want all of the troubleshooting steps to be “Turn it off an on again,” I configured the machine to automatically log on as the assigned access user.  Open Regedit and go to HKEY_LOCAL_MACHINE\SOFTWARE\Microsoft\Windows NT\CurrentVersion\Winlogon and define the value of DefaultUserName as the name of your assigned access user.  If you entered a password for that account, define the value of DefaultPassword as the password.  Change the value of AutoAdminLogon to 1.

Now reboot and observe the magic.


Is it super easy or perfect?  No, but it’s not too bad.  It probably won’t be something you deploy to your whole company, but for a one-off build it was a fun learning process.


September 21, 2015

Windows 10 Enterprise – Azure AD Join vs Workplace Join in Office 365

I’m beginning to test Windows 10 Enterprise at work.  My main goal was to test functionality of our LoB apps, but I pretty immediately became distracted with the option to perform an Azure AD Join instead of a traditional domain join.  After the initial installation, you’ll be given these options:

AzureADJoin01

Of course I had an “Oooh, lets play with the new thing!” moment and had to try the Join Azure AD option.  I was able to sign in with my o365 credentials, and was then prompted to create a PIN, with some vague statements saying that it is faster than a password.  Since our Mobile Device policies are all default in o365, I assume this will be the case for most people.  There is initially no option to skip this step, but if you click Create PIN, then close the popup, you get a new button that allows you to skip the PIN (but it will prompt you again each time you log in).

After the Azure AD Join, you’ll find that the machine is not actually domain joined, and is just a workgroup member.  No GPO gets applied, and the computer does not appear in your on-prem Active Directory.

In ye olde Control Panel>System, you’ll see something like:

AzureADJoin04In the newfangled System>About, you’ll see something like:

AzureADJoin03

And in your o365 Admin Center>Mobile Devices, you’ll see something like:

AzureADJoin02

So, you’ll notice that I have a few devices in my o365 MDM.  This is what I find a bit odd.  One of those devices I did a Workplace Join by adding my work account to a machine on which I use my personal Microsoft account as my main login (and is not otherwise connected to our domain either via Azure AD Join or traditional domain join).  So, it appears Workplace Join and Azure AD Join are essentially treated the same on the administrative side.  I will do some more research and testing, and post any updates.


So what if I want to join my Azure AD Joined computer to my domain the old school way?  Computer says no.

domainjoinerrorSo, you have to “Disconnect from organization” in the newfangled System>About screen, as shown a few images back.  Then reboot, and you can join your domain for real.


August 5, 2015

Windows 10 Device Limit Reached

Yesterday I updated my Dell Venue 8 Pro with a clean install of the official Windows 10 release.  Shortly after, I got emails and about a billion system popups notifying me that I’ve reached my device limit, like so:

Win10Devices2Many

What?  I have three Windows 10 devices.  My Lumia 1520 and home computer have been running the insider previews for months, but adding a third angered the Win10 gods.

Win10Devices

It was my understanding (and a brief Google-ing backs this up) that you can have up to 10 Windows 10 devices per Microsoft account.  I’ll keep hunting to see why my 3 devices are supposedly exceeding this limit and update this post if I sort out the cause.

Sidenote – the update on the Venue went flawlessly.  No driver issues, and no disk space issues (which I expected since it only has 22gb of usable internal storage).  This is my first use of Win10 in tablet mode, and they nailed it.  Big round of applause for Microsoft.


UPDATE: It looks like my Venue did not automatically activate after the upgrade.  Simply clicking Activate Now forced it to phone home and activate.  After that all of my pending installs of Store apps finished and there are no more notifications about device limits.


0 Comments
July 30, 2015

Configuring SCCM SMTP Notifications with Office 365

I wanted to configure SCCM alerts via e-mail, mostly for Endpoint Protection alerts, but I’m sure down the line some folks will want other subscriptions as well.  Given the options (outlined in this TechNet article), and the fact that I won’t need anything going to mailboxes outside of the domain, I chose DirectSend.  It is extremely easy to configure.  In your SCCM Console, go to Monitoring > Subscriptions, and click Configure Email Notification in the ribbon.

SCCM SMTP 1


Check the box to Enable email notification for alerts.  Enter your MX endpoint (you can look it up on your DNS server if you don’t know it).  You do not need to configure an SMTP server connection account as anonymous access works here.  Enter the sender address you want your alerts to come from, and test the settings.  Note that this sender account does not have to be a real account or mailbox – mine is simply SCCMAlerts@mydomain.com, which doesn’t exist.

Now that your email notifications are working, set up some subscriptions to spam your coworkers.  Enjoy!

0 Comments
Tags: ,
July 28, 2015

Don’t forget to decommission your 2003 servers!

0 Comments
Tags:
July 9, 2015

Office 365 ProPlus Click to Run Deployment Gotchas – Part 4

Part 4 – Click to Run installs hate traditional installs.

Today I was cruising through some SharePoint configuration, and when I went to install SharePoint Designer 2013 from the o365 portal, I got this message:

Click to Run hates Traditional Installs


The “Go online for additional help” link goes here: https://support.office.com/en-us/article/Fix-Office-365-or-Office-2013-install-errors-54554bb8-aa94-43c7-a685-408dd9868c0b?ui=en-US&rs=en-US&ad=US

So I have the base Office 2013 suite installed via Click to Run.  I then installed the “Windows Installer” (the .MSI method) versions of Visio 2013 and Project 2013.  With this setup, everything has worked for months.  Adding the CtR install of SharePoint Designer was just too much for this game of software Jenga.  I guess I’ll be downloading the “Windows Installer” (link) and seeing how that goes.  With Click to Run basically using the guts of App-V at its core, it’s a little disappointing to see it not…just work.

0 Comments
June 19, 2015

Office 365 ProPlus Click to Run Deployment Gotchas – Part 3

This is sort of an addendum to Part 1.  In my case, my users have Academic E1 licensing for o365 (note that elsewhere in the o365 portal, the same exact license is called Education E1).  This means that the vast majority of our users, being on E1, aren’t licensed for a local installation of Office.  For that reason we have a handful of Academic/Education E3 licenses for those that need them.  We are looking to deploy Skype for Business as a local installation for our users, so how does that jive with licensing?

Luckily, all we really have to do is make a new .xml configuration file for this deployment.  We can use the same ol’ Office 2013 local cache we’d made already.  All I really need to do is specify the product ID as “lyncacademicretail” and test the install.  Yes, despite telling setup.exe to install Lync, it will really install Skype for Business.

<Configuration>

<Add SourcePath=”\\YourOfflineInstallLocation” OfficeClientEdition=”32″ >
<Product ID=”lyncacademicretail”>
<Language ID=”en-us” />
</Product>
</Add>

</Configuration>

Running setup.exe /configure SkypeForBusinessAcademic.xml will install Skype for Business as an odd separate component from it’s normal home within Office 2013. It is shown in Programs and Features as “Skype for Business for designated Office 365 service plans” as shown: SfBacademic My E1 licensed users can now sign into this local install of SfB, and I don’t have any licensing issues. Definitely keep in mind that if an E1 user logs into SfB on a machine where it is installed as a subset of Office 2013, they will get an error about licensing and won’t be allowed to sign in. Like so:SfBlicense

0 Comments
June 17, 2015

Office 365 ProPlus Click to Run Deployment Gotchas – Part 2

Part 2 – Be careful when you mix Office 2013 GPOs with Office 365 ProPlus

Since I’m testing installation of Office 2013 and/or Office 365 ProPlus, I decided to test all the options for managing them.  I tracked down the Office 2013 Group Policy Templates, and started configuring them to streamline my deployments.  I set up my test VM, made sure the new GPO applied to it, and started installing Skype for Business (see Part 1 for more info on that) from my available deployments via SCCM’s Software Center.  It’s going well after sorting out those prior issues.  Now to test my deployment of the full Office 365 ProPlus suite after already installing one tiny part of it for SfB.  Boom, not working.

OfficeGPO


This very same deployment was working before, so I knew there were very few culprits.  It was either the new GPO, or the installation of SfB prior to installing the rest of the Office suite.  The error led me to suspect the GPO.  I had configured settings to stop most of the annoying first run popups.

OfficeGPO2


Those two settings prevent perfboost.exe from running.  Actually, I bet only one of them does, but I switched both back to “Not configured” and called it a day.  After that, my deployments are successful.

There doesn’t seem to be any official documentation about what perfboost.exe actually does.  It lives in C:\Program Files\Microsoft Office 15\root\office15 after installation, and doesn’t do anything visible when run on its own.

Once I started poking around in the guts of these Click to Run deployments, I started getting flashbacks from my App-V days.  Then I read more about it, and it basically is Microsoft’s alteration of App-V for Office 365.  Read more here: Overview of Click to Run.

0 Comments
May 1, 2015