UPDATE: There is an easier way to accomplish this, which I’ve detailed in a new post, found here: http://thebillablelife.com/windows-10-assigned-access-web-browser-app/
Windows 8.1 introduced “Assigned Access,” which allows an administrator to restrict a user to a single Windows Store application. This seemed to get the most use from people making simple kiosk computers that were assigned access to a single website using the Metro Immersive Windows Store app version of Internet Explorer. MSDN advised against using a web browser for assigned access, saying that they require special permissions beyond those usually granted to Windows Store apps, but it will still let you use Metro IE. In Windows 10, the Microsoft gods decided that browsers really don’t belong in Assigned Access, and you can’t choose to use them anymore. Luckily they offered some simple work-arounds:
Either make your own browser app, or just make a web kiosk the old school obnoxious way. I cursed Microsoft at their suggestion of Option 1. I’ve made web kiosks before using an expanded version of Option 2, and it generally sucks to manage because the whole damn thing is locked down, not just a single user – meaning you can’t just log out as the kiosk user, and log in as an admin to do whatever needs to be done. With Assigned Access I can just log out of the assigned access user, log in as a normal user, and have a normal user experience.
In my case, I need a public kiosk to display one website on a touchscreen monitor. The user will not browse to any other site, and I want them to have absolutely no access to the OS beyond the assigned website.
So, I chose to tackle my own browser app. I mean, it sounds easy from their casual mention of it, and it’s the first suggestion, so it’s probably the way to go. Having never really developed anything at all before, it was a learning process to stumble through Visual Studio, but it’s not bad. Note that this is based largely on this post, which explains accomplishing prettymuch the same thing but with an older version of Visual Studio, and it actually includes more than I needed, so I kept it even simpler. I’ll go through my process for how to make an assigned access web browser app in the steps below.
Step 1 – Download Visual Studio Community 2015
You can get this here. It’s free, but can gobble up a significant chunk of space (16-26gb depending on what features you choose to install). You will need to install, at minimum, the Visual C# programming language and it’s common tools, and the Universal Windows App Development Tools. Note that I installed a lot more than this out of curiosity, but these should be the minimum for doing this job.
Step 2 – Make a New Project in Visual Studio
This is straightforward. Click New Project, choose C# Blank Project, name it something relevant, save it somewhere smart (I chose a new folder in my OneDrive so I could work wherever), and you’re ready to go. It’s probably smarter to use GitHub or something Properly Deverloper-y, but I’m not a developer and I’m used to living in OneDrive, so rather than learn another new thing I decided to save there.
Step 3 – Stumble Through The Code
Here is the long-form MSDN explanation of the WebView class and all it’s features. It’s not very eye opening, or helpful to you at this point. All you really need to focus on are MainPage.xaml, and MainPage.xaml.cs.
In MainPage.Xaml you’ll get a designer view that lets you either visually drag your layout around, or edit the code directly in the window below. You’ll need the code to be this, however you do it:
Copy-and-paste-able version:
<Grid Background="{ThemeResource ApplicationPageBackgroundThemeBrush}">
  <WebView x:Name="WVWebBrowser" HorizontalAlignment="Stretch" Height="Auto" VerticalAlignment="Stretch" Width="Auto"/>
</Grid>
So that chunk is calling WVWebBrowser, which we haven’t made yet. Go to MainPage.xaml.cs and use this code:
Copy-and-paste-able version:
 {
  public MainPage()
  {
  this.InitializeComponent();
  WVWebBrowser.Navigate(new Uri("http://WebsiteYouWantToDisplay.com"));
  }
  }
Step 4 – Run Your App
Assuming you’re using Windows 10, choose to run the application on your local machine, with your chosen architecture (x86/x64) by clicking the “Play” button.
Your app should open, and you should be able to use it like it’s the real deal.
Step 5 – Graphics (optional)
This is optional, but if you browse to your project saved folder path and find the folder called Assets, it has placeholder graphics for your app. Using such quality software as Microsoft Paint, I made appropriately sized graphics for my app, which allowed it to have a swanky splash screen at start, plus look nice on the Start Menu, and allow for re-sizing the app’s tile there.
Step 6 – Create App Packages
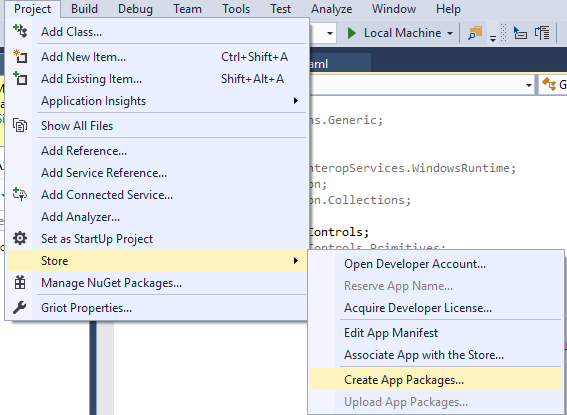
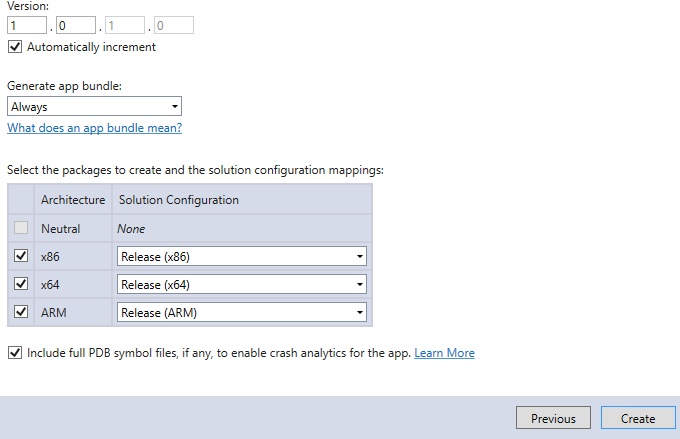
In Visual Studio, go to Project, Store, Create App Packages. You can choose to make packages for x86, x64, or ARM.
Step 7 – Install App
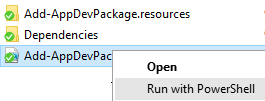
Now you can take your App Packages to the computer you’d like to use it on. Make sure that you’ve enabled Developer Mode in the Windows 10 Settings in order for this to work – it will gently remind you if you haven’t. To install, you need to browse to the App Package root, right click on the Add=AppDevPackage.ps1 script, and choose run with PowerShell.
Step 8 – Set up Assigned Access User
As an admin on the machine where you installed your new app, create a new local user account that is just a standard user. Switch user and log in as the new user, then install your app as that user and verify it works. Now go back to your admin user, and go to All Settings > Accounts > Other users, and click on “Set up assigned access.” Choose the user and your app, and that’s it. Switch user back to your new assigned access user, and your app will automatically open and keep your locked in it. To log out, Ctrl + Alt + Del.
Step 9 – Set up Automatic Login for Assigned Access User (optional)
Since this machine will be a public machine, and for simplicity’s sake I want all of the troubleshooting steps to be “Turn it off an on again,” I configured the machine to automatically log on as the assigned access user. Open Regedit and go to HKEY_LOCAL_MACHINE\SOFTWARE\Microsoft\Windows NT\CurrentVersion\Winlogon and define the value of DefaultUserName as the name of your assigned access user. If you entered a password for that account, define the value of DefaultPassword as the password. Change the value of AutoAdminLogon to 1.
Now reboot and observe the magic.
Is it super easy or perfect? No, but it’s not too bad. It probably won’t be something you deploy to your whole company, but for a one-off build it was a fun learning process.


